I am retiring the Electric Denim Studios email list and Ableton Blog on November 1st and am picking it up at my other brand The Second Spirit.
Have no fear, I still plan on writing Ableton content twice per month on The Second Spirit Newsletter. I will also have Ableton and Studio tips on The Second Spirit blog.
If You would like to keep receiving my emails about Ableton on The Second Spirit Newsletter you can transfer to by clicking this link: Free Ableton Channel Stripand signing up.
This offer ends on November 1st
Once you sign up, I will send you a free Ableton Channel Strip effects rack as my appreciation of sticking with me.
I will know you are interested in receiving Ableton/Studio content and you will be segmented into my Ableton group so that I know what to send you.
This Ableton channel strip is a quick easy plug in that I have found to be a necessity in my studio. I reach for it so often I thought it would be a great to share with you. I have tried to change it, expand it, and modified it, but I always come back to using this original, simple channel strip, unmodified. So please come join the new newsletter and try it out for yourself.
After November 1st I will stop sending the Electric Denim Studios newsletter.
I am making this move because it is too complicated and tedious having two brands, blogs and websites.
I am a single owner who writes music and records with Ableton. I also street perform and sell used audio gear. Hey, I really can’t tell you how much I appreciate your reading this, and plan on giving you great content in the future.
Thanks for understanding,
Matthew Victory
P.S. You may have clicked links in my previous emails telling me that you are interested in other things, such as performing tips, used gear, etc. I still have that information and may segment my lists into these topics at The Second Spirit.
Have you ever heard about the benefits of checking your mix in mono?
When you put a mix in mono you can accurately hear how the volume of each track correspond with each other.
Many people will test the mix in mono to see if certain tracks are too hot or too low.
The Utility plug in is great for this. You can put it at the end of your master bus.
Set The Utility Width To 0%, turn it on, and now you can hear your whole mix in mono.
2 – Gain Stage Your Automated Track Volume
Have you ever had tons of volume automation on a track, then need to adjust the total volume so that it fits better in the mix?
You could select all the volume automation in the track then drag it up and down, but this is tedious and can take some time.
It is easiest just to add the Utitlity plug in at the end of the track. Then use its gain knob to adjust the total volume of the track. This will maintain all of the volume automation you programmed and give you a final gain stage for the track.
Tip – If your feeling experimental you could use the Utility’s Gain knob to program your tracks volume automation. This would allow you to still use the mixer in the session view to mix your song because all your track’s volume automation would be programmed as the Utility’s gain knob. You could also turn the tracks gain automation on or off by turning the utility on or off.
3 – Overcome The Fletcher Munson Curve With A -10 DB Dim Button
It is a good idea to listen to your mix at different volumes (DBs).
Many mixers have a -10 DB Dim button to check their mix at lower volumes.
This is because our ears hear different frequencies at different volumes. This is knows as the Fletcher Munson Curve.
When you listen to your mix at lower volumes you will hear more mids.
So it is best to get your mix to sit nice at normal monitoring volumes and at diminished volume such as – 10 DB.
The Utility plug in is great for this.
You put it at the end of your master bus, set the Utility’s gain knob to -10 DB.
Then anytime you want to check your mix at lower volumes you just turn on and off the utility.
Tip – A good set up may be something like this on the master bus. Two Utility effects back to back. With a click of a button, you could check your mix in mono and see how it sounds at -10 DB.
To save CPU usage and ram so that your computer is faster – or run your project on a laptop rather then in the studio
To clean up a cluttered and confusing song projects
To have a good back up
Why do you want to make stems? Depending on your answer, you may want to use different methods of creating stems.
For example, I want to bounce song stems to make a less cluttered project I could mix on my laptop. Because of this, I want to keep all the tracks sounding exactly the same. I am not going to remove automation, or turn off effects, or normalize the tracks.
If you are sending the project to a mix engineer you may want to delete all of the automation and effects. It just depends on what you are trying to do
I rendered all the tracks to stems, but when I put them in a new project it doesn’t sound the same
Yep, this is the exact problem I had and why I have made this tutorial. I had a complicated project I wanted to bounce to stems to make editing easier, but when I imported the stems into a new Ableton project it sounded a lot different then my original mix. Here is why:
I had a lot of group tracks. If you don’t mute the sub group tracks in your new project you will hear all of them.
I had effects and automation on the master chain
I will delve more into this later in the post, but first lets go through some basics.
Save yourself a new project to make stems with
This way you don’t screw up your old mix if you end up fiddling with stuff.
All rendered tracks are done post fader
This means Ableton will render what you hear after all effects, pan, volume, and midi instruments on the track. In other words, it will take the render at the end of the chain, the very end of the track.
[optinform]
Remember it renders Solos, Mutes and Automation
Don’t forget to activate your tracks, make sure their respective track button is green and turn off any soloed tracks.
Ableton Renders Solos, Mutes and Automation
Make sure you push the “back to arrangement button”
For the sake of this tutorial, we don’t want to render session clips. I am just referring to rendering tracks on the arrangement view. Because of this, we want to make sure our session clips are not playing in the background or they will get rendered too. Just make sure the orange “back to arrangement button” has been clicked and is no longer showing. This means your session clips will not play or be rendered.
Ableton Switch Back to Arrangement Button
A good method of naming tracks before exporting multiple stems
When you export multiple stems using the “All Individual Tracks” export method, it is a good idea to number, sub number and label return tracks. This way when you import them into a new project you know what tracks are sub groups and returns. Usually we all have our tracks named already, but the problem I had, is that I didn’t know which were sub group tracks. I have come up with this way of naming the tracks-
Regular Track = 1-0, 2-0, 3-0 and so on
Main Group Track = 1-0, 2-0, 3-0 and so on
Sub Group Track = If the main group track was “3-0” then the sub group tracks would start at “3-1” and keep going “3-2”, “3-3”, “3-4” etc.
Return Track = A, B, C and so on followed by the name of the track. For example “A Reverb”, “B Delay” etc.
Master = You cant rename the master. If you don’t have more then 12 return tracks it will end up as the last track. If you have more than 12 return tracks, you will just have to pluck it out your tracks and drag it to the first or last track.
When you drag these tracks into a new project they will be organized by the track number. The sub group tracks will be organized after the main group tracks and will be easy to identify. It will also be easy to see the return tracks.
Organized Way To Render Ableton Stems
The 4 different ways to bounce tracks in Ableton
Master
All Individual Tracks
Selected Tracks Only
Particular Single Tracks from The Drop Down Menu
Exporting Ableton Stems – The 4 Methods
What these different render options do. . . and their limitations
Master
Simple – once stereo or mono file of your master mix buss
All Individual Tracks
Each individual track as its own stem
Each main group track mix as a single stem
All of the sub group tracks as individual single stem
All of the return tracks as individual single stem
The master buss track as a single individual stem
Selected Tracks Only (Watch out, it has some limitations – See Below)
You can select multiple tracks by holding the control key and selecting multiple tracks. The ones selected and highlighted will be bounced down to individual stems. Unfortunately, you will be unable to select from these different sections at the same time – main tracks, sub group tracks, aux track, master buss track. You can only render from one of those four different sections at a time. I describe more on this below.
multiple main tracks at once – you will not be able to include aux tracks, sub group, or the master track. If you were to select tracks inside a group track, then close the group track and select other tracks, Ableton would only stem out the main mixed group track, not the sub group tracks. This is because of Ableton’s selection method. If you hold down control and select a few tracks inside a group track, you have to close the group to select tracks outside the group. This causes the mixed main group track to be selected. Hence only the main group track mix will be stemmed out – not the individual sub group tracks that you selected inside the main group track.
multiple sub group tracks inside a one particular group track . You can stem out individual tracks inside a group track using this method, but you can only stem multiple sub group tracks in one particular group per render.
multiple return tracks at once. You can select multiple return tracks per render, but you will not be able to include any other tracks. You will have stem other tracks in a separate render.
mater track – you can only do a master track by itself and not include any other tracks
Particular Single Tracks Listed – Easy, choose one track from the drop down list to stem out.
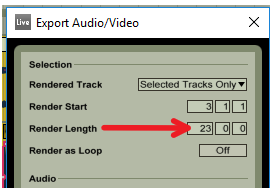
Select the amount of time to render.
You can do this by clicking and dragging in the project to select and highlight an area. You can also position your loop bar to where you want to render then click it so it highlights the time. After you enter the render menu, you can adjust the selected render time.
(for the most part, but if you want to get technical, bounce is usually refereed to rendering a mix of multiple tracks and printing tracks is used a lot when talking about rendering MIDI tracks into audio tracks.)
[optinform]
Go here to render and bounce song stems
File / Export Audio-Video / Rendered Track – “Select from the drop down Menu”
How to Export Ableton Stems
You can re-adjust the selection time of what is rendered here if needed
[ti_icon icon=”ti-hand-point-right” size=”default” style=”icon-left” corners=”default”]Just a note, if you adjust the time in the render menu, the render length is how many bars the render is, it is not the bar number the render ends at.
Render as Loop
If you select this option, it will add any trailing effects such as reverb or delay from the end of the render to the beginning of the tracks. You would use this if you are going to use the rendered tracks as loops and you would want the beginning and end to be seamless.
For the best sounding Rendered Audio Tracks, try to have sample rate the same across the board
In a general, you want all of the files in the project to be the same sample rate, and you want it to match the sample rate selected in the audio preferences setting. If the audio tracks are a different sample rate than the playback sample rate, there will be some signal degradation when listening or rendering. So it is best to have everything at the same sample rate.
If you have tracks that you need to change the sample rate for to match the project, you would want to make sure the play back is set the same as the track sample rate then render that those tracks out. Then re import them with the new sample rate so that everything matches.
If you change the sample rate when rendering, it could introduce some signal degradation. Although it may not be apparent or audible, and Ableton’s sample rate converter is of very high quality, it is best to try to keep everything at the same sample rate (rendering, playback, recording, and individual audio tracks.)
Bit Depth and Dithering
All of Ableton’s internal processing is at 32 bit, so making any change (volume, adding effects, adding vsts etc.) to an audio track that is 16 or 24 bit will make the resulting audio 32 bits. Dithering is used to help soften down-sampling the bit depth. Since dithering should never be used more than once on an audio file, It is best to render everything at 32 bit and to not down-sample the bit depth at all. This way the only dithering the audio files may get is from a mastering engineer.
Rendering a audio file to the same or higher bit depth as the original audio file does not create any signal degradation. But remember, changing the sample rate higher or lower does.
Create an Analysis File?
Yes, if you are going to re-import this into an Ableton project. This file will help speed up the audio waveform display when imported into new a project. I find it best to do this in the batch render rather then waiting for it to reanalyze the files later. It analysis file also has clip settings.
If your not going to use these stems in Ableton again, you don’t need select this option.
Normalize? probably not
This option basically amplifies audio file to the highest volume that can be obtained so that its peak is at the maximum. Since I am trying to reproduce the mix the way I have it, I don’t want any changes in volume. I am not going to select this option.
Normalizing does cause some signal degradation since it is a volume change. Not sure if you are going to hear it but I wanted to let you know.
Naming your rendered remix stems
When you choose to bounce song stems, you can choose where to save them in and what to name them. Naming can combine the corresponding audio track name and more. See below.
If you are exporting MULTIPLE stems viva the “All Individual Tracks” or “Selected Tracks” method.
If you add a name when you are in the save as menu, it will export the stems with the file name added then the corresponding Ableton track on each particular stem.
If you don’t add a name but just add the file extension (.wav or .aif) it will export the stems with only the name of the corresponding Ableton track on each particular stem.
If you are exporting a single stem
If you add a name when you are in the save as menu, it will export the stems as the file name you added and IT WILL NOT add the corresponding Ableton track name aferwords.
If you don’t add a name but just add the file extension (.wav or .aif) it will export the stems with only the name of the corresponding Ableton track on each particular stem.
Import the new stems into a new Ableton project
If you are trying to keep automation or markers from your original project, save your stem project as a new project.
Once the project is saved as a new project, delete all the tracks except one. (Ableton requires you to have one track in the project.)
Go to your folder Ableton rendered your new stems to
Click the sort file button so its sorts your stems alphabetically.
Select all of your stems. (you can select .asd files also, that way you don’t have to sort them out)
Drag them into the new project holding the “control key” so that it drops them in vertically.
Delete the one audio track you Ableton made you leave in before we imported the stems
Mute or delete the subgroup tracks if they were routed to your main group track in the original project. Also mute your Master track stem so that the project sounds the same as the original.
This new Ableton download from Electric Denim Studios is a ducking delay effects rack. It has the ability to add ducking delays to your audio track. Ducking delays are delays that only raise in volume when vocals or other instruments are not playing. Then the delays are quieted when the vocals or instruments sound is heard in the track. This happens automatically so that you don’t have to spend a lot of time programming delay automation.
Electric Denim Studios ED0007 Ableton Ducking Delay Demo
Watch the ED0007 in action on a vocal loop and learn about its different functions.
Controls how fast the volume of the ducking delays increases.
Controls the delay time of the Ducking Delay starting at a 1/16th note up to 1/2 note in 1/16 note increments. This is synced to your master tempo in Ableton.
Controls how many delay repetitions are heard.
Choose between Low Pass, Band Pass, High Pass, Notch and Morph Filters.
Choose the frequency the filter is set at. You can choose between 26Hz to 19.9kHz
Choose the resonance or Q of the filter
Adjust the amount of a chorus added to the ducking delay.
Adjust the amount of Dry Volume. This is on the second chain inside the rack labeled “Dry” underneath the “Delay” chain.
In this live audio interview, Mick Guzauski discusses the gear and techniques he used to record and mix the award winning Daft Punk album “Random Access Memories”. Grammy winner Mick Guzauski has mixed many greats, including Prince, Eric Clapton, Snoop Dogg. In this interview, Mick is being asked questions by one of my favorite audio blogger Graham Cochrane from the Recording Revolution.
I was able to record this interview at the Audio Bloggers Live charity event in Santa Monica California on March 6th, 2016. It was such and incredible event and I am so happy I went. I learned so much, but it wasn’t until I wrote this blog post that certain techniques and equipment really stuck. If it wasn’t for you reading this, or the aspiration of having readers read this, I wouldn’t have learned as much. So thank you!
Mick Guzauski and Graham Cochrane Audio Interview
Phoenix House Helps Teens Overcome addiction with Music
This charity was put on by Ronan Chris Murphy from Recording Boot Camp to help support on to help Phoenix House. Phoenix House is a organization that helps teens overcome addiction by using music. Its a great cause and all of the Audio Bloggers Live proceeds went to help Phoenix House carry on its work. You can check out the stories of how the Pheonix House has helped so many here.
Here are the Gear and Goodies he used for Daft Punk
Kick Drum
4 mics on kick
Sony c-500 condenser for the beater click, handles high spl, has a very extended top end, discontinued
Sennheiser MD421 for low mid punch (I think he put this inside the kick)
Drum subkick with yamaha speaker (uses a yamaha speaker inside a drum shell wired like a microphone to capture the low end). I couldn’t find a yamaha one of these but here is a different brand to give you the idea of what he was talking about – Solomon Drum Sub
Tried to position the mics so the phase was good, didn’t have to use sharp eqs, didn’t want them to sound too filtered.
[products ids=”5852 , 5881″]
Overheads
It was hard to hear but I think he mentioned Schoeps 5c or Schoeps 5u mics for overheads (The 5u is a shotgun mic, so I could be mistakened, but mabye it is used at an angle to not get toms other bleeds. Please leave a comment if you can fill me in on these). Thanks Les! For letting me know that he might be talking about the Schoeps CMC 5. These have the removable capsules. I couldn’t find any to show you as links, but I did find some Schoeps CMC6 you can check out below. These are very similar.
[products ids= “7308, 7305, 5885”]
Grammy Winner Mick Guzauski’s tips for Home Studio Owners Below [ti_icon icon=”ti-angle-double-down” size=”medium” style=”icon-left” corners=”default” text_color=”purple” background_color=”purple” icon_color=”purple”]
At the bottom of this post, I made a list of Grammy winner Mick Guzauski’s advice for the home studios owner. He sheds some light on some cool tricks and gear that I put into bullet points for easy reading.
Pre Amps (He Used for Daft Punk)
API 312 for kick and snare nice punchy sound. I am not sure if he used the original old ones or one of the new ones API 3124mb+
Console preamps and EQs from the Neve 88R for toms console
How he Achieve a Massive Low end Without Sacrificing Clarity Below
After the conference I was so AMPED to create more music but it wasn’t until I wrote this post that I really took in some things I missed. Grammy winner Mick Guzauski talks about a cool drum editing technique to help drum fills fit in the mix. I hit on below – in the How to have a massive low end but clarity in the mix section.
Some songs tracked to a Studer A827 15 ips with dolby sr, two sr racks running in repro
The digital signal had higher transients because the peaks were not compressed to avoid clipping recording at lower levels
Tape was punchy, didn’t have the transient detail, smoother warmer, analog 15 ips bottom end was big because anolog 15 ips headbump around 15 to 30 hz.
[products ids=”5888″]
Mixing
Was not hard but a long process because did it all on an analog console, spent whole summer mixing,
His experience with Daft Punk recording “Random Access Memories”
He talks about how they wanted to go real natural on the acoustic recordings. He wanted to avoid too much filtering and was wanting to get a warm sound with minimum EQ. A 70s sound. He tried to achieve the sound he wanted in the begining by using different mics and mic placements. He wanted try to get the recorded sound so it would sound real close to how it would sound when it was done without processing.
Grammy winner Mick mentioned how this project was one of the funnest he has done. He felt like he had the Vintage Kings entire show room in the studio. Sounds like a blast!
Grammy Winner Mick Guzauski’s tips for Home Studio Owners
Have a few varied types of microphones
Some good small and large diphram condesers
Some dynamics
Have some preamps
couple transformerless preamps with fast electronics for thing that you want to be real accurate
Some transformer preamps (fat in the low end)
Most Important
Instruments are sounding good
Mics in good postition
Not picking up leakage from other mics
Not to short of distance from one mic to the other so there are no phase problems
Watch out for comb filter from phase problems
Use the cardioid pattern to help reduce phase problems
How he got Massive Low End but Clarity on the Rest of the Mix
Make sure there isn’t any interference from other instruments going close to the fundamental of the low end
Thin out alot of the other instruments
Make sure everything is nicely in tune so there are no beat frequencies
Carving out frequencies so there are not conflicts in one frequency range
gentle high pass filters on guitar an vocals to keep it out of the range of the bass and kick
Make sure that some of the things that resonate like toms and stuff were edited and the ring was taken out. This is one trick he uses on the toms in drum fills
The mics on the toms pick up a lot of ringing when the snare, kick and cymbals are hit. This following procedure lowers the ringing down -10db throughout the song except when the toms are hit in the song or the drummer uses them in a fill. Then they are at the full 0DB volume.
He would take his tom tracks and turn their audio clip gain down -10 db or so. (Clip being the audio blob inside the track. Usually in DAWs, you can change the gain of the audio clip without chaining track volume level on the mixer. The tracks slider level on the mixer would still be at 0DB, but the audio clip (audio blob) itself would be -10DB).
He now slices the audio clips (audio blob inside the track) around the tom fills. He raises those sliced fills back up to 0DB. So let’s say there is a fill 1 measure long on measure 50. He slices the audio clip (audio blob) right before the fill (around the end of measure 49) and after the fill around measure 51 or 52.
He now raises that sliced fill back up to 0DB.
He then crossfades these fills so it doesn’t jump from -10DB to 0DB and vice versa.
He may use this technique on each individual tom hit or sometimes he may use it around the whole fill. It’s hard to tell for sure from this interview and he probably does both depending on how it sounds. If it was a fast fill, he may just slice around the whole fill instead of each tom hit.
Didn’t go for a lot of volume and didn’t compress to much.
The peaks remained peaks not crunched down.
Gentle compression a couple DB 4 at most
Not extremely fast attack on compression so that it lets some transients through
Good arrangements
Mix to keep everything articulate
How does the Grammy winner know when the mix is done
including interviews with Bob Clearmountain, Dylan Dresdow, John Rodd, Brian Lucey, Maor Appelbuam, Jonathan Leahy, Michael Laskow, Bob Mair, Marks Smith, Ronan Chris Murphy, Graham Cochrane, Joe Gilder, Ian Shepherd
Thank You for Reading
Thank you for reading this and if you want more tutorials, interviews and reviews please sign up for my newsletter below. If your looking for a particular piece of used audio gear contact me.
photo credit: via photopin(license)
Mick Guzauski, Bob Clearmountain, Dylan Dresdow, John Rodd, Brian Lucey, Maor Appelbuam, Jonathan Leahy, Michael Laskow, Bob Mair, Marks Smith,
Ronan Chris Murphy, Graham Cochrane,
Joe Gilder, Ian Shepherd
Support Phoenix House – Audio Bloggers Live – Music Mixer Charity Conference
I had a incredible time at the Audio Bloggers Live music mixer charity conference put on to help Phoenix House. Phoenix House is a organization that helps teens overcome addiction by using music. Its a great cause and all of the Audio Bloggers Live proceeds went to help Phoenix House carry on its work. There are so many ways to help Phoenix House so that it may help people overcome addiction. Click here to find out more Help Phoenix House.
Audio Seminars, Panels and Interviews
Mick Guzauski on Mixing Daft Punk’s Random Access Memories Interviewed by Graham Cochrane
Bob Clearmountain and Dylan Dresdow on Mixing interviewed by Ronan Chris Murphy
Here is Ronan Chris Murphy interviewing Bob Clearmountain who has mixed David Bowie, The Rolling Stones and Nine Inch Nails and Dylan Dresdow who has mixed Black Eyed Peas, Pink and Wu Tang Clan.
John Rodd, Brian Lucey, Maor Appelbuam on Mastering interviewed by Ian Shepherd
Here is Ian Shepherd hosting a mastering panel discussion with some of the best mastering engineers John Rodd who has mastered Breaking Bad and Star Wars: Battlefront and The Lincoln Lawyer, Brian Lucey who has mastered The Black Keys, Arctic Monkeys and Cage The Elephant, and Maor Applebaum who has mastered Faith No More, Yes and Sepultura.
Jonathan Leahy, Michael Laskow, Bob Mair, on Sync Placement Interviewed by Joe Gilder
Here is Joe Gilder hosting another panel on how get your music in to film and TV with music supervisor Jonathan Leahy who placed music in the HBO show Girls, Fruitvale Station and Trainwreck, the founder of online A & R company Taxi Michael Laskow, and Bob Mair the owner of Black Toast music licencing and publishing which has placed music in True Blood, The Good Wife and Pitch Perfect 2.
Marks Smith’s inspiring story of how Pheonix House uses music to help teens battle drug addiction.
Ronan Chris Murphy on Recording Levels
Here is Ronan Chris Murphy of Recording Boot Camp talking about Analog to Digital Clipping and how there is no benefit of recording hot compared to lower level through your AD converter.
I have been listening to a lot of audio bloggers podcasts such as the the Home Studio Corner PodcastPensados Place and the Simply Recording Podcast the past year and have learned so much from them. I even did an EP challenge with Joe Gilder from Home Studio Corner last year. I think I heard about the conference on the Home Studio Corner Podcast and it turned out that presale tickets were only $27, I knew I had to jump in the car and drive down to Santa Monica for the weekend. Plus it was my birthday, so I thought it would be a good excuse to get me out of town.
As far as the guest speakers, WOW, Some of the most amazing mix and mastering engineers were there as well as some other top people in the industry.
When I first got there I was feeling a little antisocial but I started reaching out and introducing myself to people. I made some great friends and had a lot of inspiring conversations. It was nice to meet a lot of home studio folks. I feel somewhat isolated in Las Vegas when I am working in my home studios, so it was nice to meet others like me. It was also great to meet Joe Gilder after working with him online in the EP challenge.
My Take Aways
When mixing check the mix at maybe a level lower maybe “-12db lower” because the nature of audio changes at different volume levels
Most of the mix engineers mentioned that they will mix a final version louder and more pushed for A&R. This is a version they feel it should sound like. Then they have a mix for the mastering engineer with maybe some compression on the mix bus but no limiting a little softer so the mastering engineer can have because there is some art in the louder version that they want to convey to the mastering engineer.
“How to know when a mix is done?” Bob Clearmountain stated that if he can listen to it twice all the way throught without reaching for a knob, then it is done. I liked this.
Have a playlist of my favorite songs to use as reference songs and to also learn what they sound like on my monitors
As far as an analog to digital converter is concerned there is very very little difference in recording at 0 db to -30 db. So keep the peaks at -10db when recording so I don’t clip when I get a one of a kind performance
When done mixing print multiple stems
Print Main
Print Instrumental without changing the volume
Print a short TV version 30 seconds to 1 minute
Print Stems
Most music for TV is selected and not hired out meaning most of the time they find something they like and use it instead of asking somebody to write something for this part in the show
It is quick and easy to change the publisher. If I was to self publish my stuff first then I wanted to use a publisher later it is quick and easy to change publishers