Yamaha RX5 Drum Machine Sounds & Quick Run Through
I wanted to let you guys hear this drum machine and show you how to quickly use it.
[product id=”7739″]
I wanted to let you guys hear this drum machine and show you how to quickly use it.
[product id=”7739″]
This quick video shows you how to do a Factory Reset & Load Demo Song & Presets on a Yamaha RX5 Drum Machine
looking for this item used?
[product id=”7739 “]
I love some of the Saws and Pads in this synth. I thought I would run through some of them so you can hear them. The Z-Plane filter sounds pretty awesome too.
This item is for sale here:
E-Mu Morpheus Synthesizer

I am retiring the Electric Denim Studios email list and Ableton Blog on November 1st and am picking it up at my other brand The Second Spirit.
Have no fear, I still plan on writing Ableton content twice per month on The Second Spirit Newsletter. I will also have Ableton and Studio tips on The Second Spirit blog.
If You would like to keep receiving my emails about Ableton on The Second Spirit Newsletter you can transfer to by clicking this link:
Free Ableton Channel Strip and signing up.
Once you sign up, I will send you a free Ableton Channel Strip effects rack as my appreciation of sticking with me.
I will know you are interested in receiving Ableton/Studio content and you will be segmented into my Ableton group so that I know what to send you.

This Ableton channel strip is a quick easy plug in that I have found to be a necessity in my studio. I reach for it so often I thought it would be a great to share with you. I have tried to change it, expand it, and modified it, but I always come back to using this original, simple channel strip, unmodified. So please come join the new newsletter and try it out for yourself.
After November 1st I will stop sending the Electric Denim Studios newsletter.
I am making this move because it is too complicated and tedious having two brands, blogs and websites.
I am a single owner who writes music and records with Ableton. I also street perform and sell used audio gear.
Hey, I really can’t tell you how much I appreciate your reading this, and plan on giving you great content in the future.
Thanks for understanding,
Matthew Victory
P.S. You may have clicked links in my previous emails telling me that you are interested in other things, such as performing tips, used gear, etc. I still have that information and may segment my lists into these topics at The Second Spirit.

Have you ever heard about the benefits of checking your mix in mono?
When you put a mix in mono you can accurately hear how the volume of each track correspond with each other.
Many people will test the mix in mono to see if certain tracks are too hot or too low.
The Utility plug in is great for this. You can put it at the end of your master bus.
Set The Utility Width To 0%, turn it on, and now you can hear your whole mix in mono.

Have you ever had tons of volume automation on a track, then need to adjust the total volume so that it fits better in the mix?
You could select all the volume automation in the track then drag it up and down, but this is tedious and can take some time.
It is easiest just to add the Utitlity plug in at the end of the track. Then use its gain knob to adjust the total volume of the track. This will maintain all of the volume automation you programmed and give you a final gain stage for the track.


It is a good idea to listen to your mix at different volumes (DBs).
Many mixers have a -10 DB Dim button to check their mix at lower volumes.
This is because our ears hear different frequencies at different volumes. This is knows as the Fletcher Munson Curve.
When you listen to your mix at lower volumes you will hear more mids.
So it is best to get your mix to sit nice at normal monitoring volumes and at diminished volume such as – 10 DB.
The Utility plug in is great for this.
You put it at the end of your master bus, set the Utility’s gain knob to -10 DB.
Then anytime you want to check your mix at lower volumes you just turn on and off the utility.


Why do you want to make stems? Depending on your answer, you may want to use different methods of creating stems.
For example, I want to bounce song stems to make a less cluttered project I could mix on my laptop. Because of this, I want to keep all the tracks sounding exactly the same. I am not going to remove automation, or turn off effects, or normalize the tracks.
If you are sending the project to a mix engineer you may want to delete all of the automation and effects. It just depends on what you are trying to do
Yep, this is the exact problem I had and why I have made this tutorial. I had a complicated project I wanted to bounce to stems to make editing easier, but when I imported the stems into a new Ableton project it sounded a lot different then my original mix. Here is why:
I will delve more into this later in the post, but first lets go through some basics.
This way you don’t screw up your old mix if you end up fiddling with stuff.
This means Ableton will render what you hear after all effects, pan, volume, and midi instruments on the track. In other words, it will take the render at the end of the chain, the very end of the track.
[optinform]
Don’t forget to activate your tracks, make sure their respective track button is green and turn off any soloed tracks.

For the sake of this tutorial, we don’t want to render session clips. I am just referring to rendering tracks on the arrangement view. Because of this, we want to make sure our session clips are not playing in the background or they will get rendered too. Just make sure the orange “back to arrangement button” has been clicked and is no longer showing. This means your session clips will not play or be rendered.

When you export multiple stems using the “All Individual Tracks” export method, it is a good idea to number, sub number and label return tracks. This way when you import them into a new project you know what tracks are sub groups and returns. Usually we all have our tracks named already, but the problem I had, is that I didn’t know which were sub group tracks. I have come up with this way of naming the tracks-
When you drag these tracks into a new project they will be organized by the track number. The sub group tracks will be organized after the main group tracks and will be easy to identify. It will also be easy to see the return tracks.


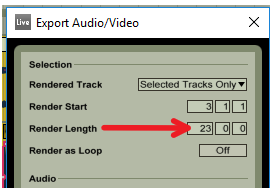
You can do this by clicking and dragging in the project to select and highlight an area. You can also position your loop bar to where you want to render then click it so it highlights the time. After you enter the render menu, you can adjust the selected render time.
[ti_icon icon=”ti-hand-point-right” size=”default” style=”icon-left” corners=”default”] Quick Terminology Render = Bounce = Print
(for the most part, but if you want to get technical, bounce is usually refereed to rendering a mix of multiple tracks and printing tracks is used a lot when talking about rendering MIDI tracks into audio tracks.)
[optinform]
File / Export Audio-Video / Rendered Track – “Select from the drop down Menu”

[ti_icon icon=”ti-hand-point-right” size=”default” style=”icon-left” corners=”default”]Just a note, if you adjust the time in the render menu, the render length is how many bars the render is, it is not the bar number the render ends at.
If you select this option, it will add any trailing effects such as reverb or delay from the end of the render to the beginning of the tracks. You would use this if you are going to use the rendered tracks as loops and you would want the beginning and end to be seamless.
In a general, you want all of the files in the project to be the same sample rate, and you want it to match the sample rate selected in the audio preferences setting. If the audio tracks are a different sample rate than the playback sample rate, there will be some signal degradation when listening or rendering. So it is best to have everything at the same sample rate.
If you have tracks that you need to change the sample rate for to match the project, you would want to make sure the play back is set the same as the track sample rate then render that those tracks out. Then re import them with the new sample rate so that everything matches.
If you change the sample rate when rendering, it could introduce some signal degradation. Although it may not be apparent or audible, and Ableton’s sample rate converter is of very high quality, it is best to try to keep everything at the same sample rate (rendering, playback, recording, and individual audio tracks.)
All of Ableton’s internal processing is at 32 bit, so making any change (volume, adding effects, adding vsts etc.) to an audio track that is 16 or 24 bit will make the resulting audio 32 bits. Dithering is used to help soften down-sampling the bit depth. Since dithering should never be used more than once on an audio file, It is best to render everything at 32 bit and to not down-sample the bit depth at all. This way the only dithering the audio files may get is from a mastering engineer.
Rendering a audio file to the same or higher bit depth as the original audio file does not create any signal degradation. But remember, changing the sample rate higher or lower does.
Yes, if you are going to re-import this into an Ableton project. This file will help speed up the audio waveform display when imported into new a project. I find it best to do this in the batch render rather then waiting for it to reanalyze the files later. It analysis file also has clip settings.
If your not going to use these stems in Ableton again, you don’t need select this option.
This option basically amplifies audio file to the highest volume that can be obtained so that its peak is at the maximum. Since I am trying to reproduce the mix the way I have it, I don’t want any changes in volume. I am not going to select this option.
Normalizing does cause some signal degradation since it is a volume change. Not sure if you are going to hear it but I wanted to let you know.
When you choose to bounce song stems, you can choose where to save them in and what to name them. Naming can combine the corresponding audio track name and more. See below.
[optinform]
[products ids="5443,5433"]

This new Ableton download from Electric Denim Studios is a ducking delay effects rack. It has the ability to add ducking delays to your audio track. Ducking delays are delays that only raise in volume when vocals or other instruments are not playing. Then the delays are quieted when the vocals or instruments sound is heard in the track. This happens automatically so that you don’t have to spend a lot of time programming delay automation.
The parameters of this effect are easy to control with the assigned macro knobs
Controls the volume of the Ducking Delay

On the treadmill they suck. In the car they suck. In my pocket they suck. Winding, unwinding, knotting. They hard to put back into the Apple case. They get tangled in my pocket with my keys. They are always catching on something and popping out of my ears. Ouch! Getting caught here, getting caught there.
One time I was running on the treadmill and my head just bopped back enough so that my wired headphones pulled my iPhone off the holder, onto the spinning treadmill, throwing the case off, hurting my ears from the cord being snapped. Oh, and there were cute girls around, what a disaster. How embarrassing. I hate wired headphones. I never want to go back.
So a couple years ago I picked up some cheap Bluetooth Connectland headphones under $30. Just to try out. I thought they were cheap enough that if I didn’t like them, no big deal right?
These Connectlands are awesome! They connected paired easily with my iPhone. I charge them up, and they last around a week depending on how much I use them. Perfect for the gym, for walking to work, for running, biking, commuting. And, they actually sound great.
So they are pretty basic. Once you pair them with your Bluetooth device, you can control playback from the headphones themselves. There is a play/pause button in the middle. A volume up and down on the bottom and a foreword and back button on top. So you can skip or go back to a previous song or track and turn up or down the volume. The also have a mic so that you can talk to people on your phone with them but it is not very clear. I mostly just use them to listen to music and or podcasts when I am working out or on the go.
(may have better results when new)
Charge time 2:21 hours
Playtime 5:42 hours over a span of 8 Days
I am home studio musician. I record songs and test their mix on different speakers and headphones . . . but I never test my songs on these headphones anymore.
The reason I don’t use these headphones for mixing is they make everything sound great. I don’t know why or how. Maybe it is the way the foam fits on the ear, maybe its some natural compression of some sort, or the high bass response, I don’t know. They just make everything sound warm and full, kinda like your are listening to a record on a old tube amp. They have a very warm sound.
So I don’t use these Connectland Bluetooth headphones to test my mixes anymore, because even my mixes that have problems sound good on them. And every time I thought I had a mix down. After listing on these headphones it turns out the mixes were not good. And only when I listing to them on my Mackie hr-824s studio monitors or my car stereo or my apple earbuds I can hear the problems. These headphone make bad mixes sound good. Say what you will, but these are an undiscovered cheap gem.

In this live audio interview, Mick Guzauski discusses the gear and techniques he used to record and mix the award winning Daft Punk album “Random Access Memories”. Grammy winner Mick Guzauski has mixed many greats, including Prince, Eric Clapton, Snoop Dogg. In this interview, Mick is being asked questions by one of my favorite audio blogger Graham Cochrane from the Recording Revolution.
I was able to record this interview at the Audio Bloggers Live charity event in Santa Monica California on March 6th, 2016. It was such and incredible event and I am so happy I went. I learned so much, but it wasn’t until I wrote this blog post that certain techniques and equipment really stuck. If it wasn’t for you reading this, or the aspiration of having readers read this, I wouldn’t have learned as much. So thank you!
This charity was put on by Ronan Chris Murphy from Recording Boot Camp to help support on to help Phoenix House. Phoenix House is a organization that helps teens overcome addiction by using music. Its a great cause and all of the Audio Bloggers Live proceeds went to help Phoenix House carry on its work. You can check out the stories of how the Pheonix House has helped so many here.
Kick Drum
[products ids=”5842, 5701, 5844″]
Snare
[products ids=”5852 , 5881″]
Overheads
[products ids= “7308, 7305, 5885”]
At the bottom of this post, I made a list of Grammy winner Mick Guzauski’s advice for the home studios owner. He sheds some light on some cool tricks and gear that I put into bullet points for easy reading.
Pre Amps (He Used for Daft Punk)
Baffled drums real tight but had some Room mics
[products ids=”5883, 5707″]
After the conference I was so AMPED to create more music but it wasn’t until I wrote this post that I really took in some things I missed. Grammy winner Mick Guzauski talks about a cool drum editing technique to help drum fills fit in the mix. I hit on below – in the How to have a massive low end but clarity in the mix section.
[ti_icon icon=”ti-angle-double-down” size=”medium” style=”icon-left” corners=”default” text_color=”purple” background_color=”purple” icon_color=”purple”]
[products ids=”5888″]
He talks about how they wanted to go real natural on the acoustic recordings. He wanted to avoid too much filtering and was wanting to get a warm sound with minimum EQ. A 70s sound. He tried to achieve the sound he wanted in the begining by using different mics and mic placements. He wanted try to get the recorded sound so it would sound real close to how it would sound when it was done without processing.
Grammy winner Mick mentioned how this project was one of the funnest he has done. He felt like he had the Vintage Kings entire show room in the studio. Sounds like a blast!
[products ids=”5707, 5912, 5907, 5842 ,5905 ,5908″]
including interviews with Bob Clearmountain, Dylan Dresdow, John Rodd, Brian Lucey, Maor Appelbuam, Jonathan Leahy, Michael Laskow, Bob Mair, Marks Smith, Ronan Chris Murphy, Graham Cochrane, Joe Gilder, Ian Shepherd
Thank you for reading this and if you want more tutorials, interviews and reviews please sign up for my newsletter below. If your looking for a particular piece of used audio gear contact me.
photo credit: via photopin (license)

[ti_icon icon=”ti-arrow-circle-down” size=”large” style=”icon-left” corners=”rounded” link=”#unique-identifier” text_color=”black” background_color=”orange” icon_color=”purple”]
I had a incredible time at the Audio Bloggers Live music mixer charity conference put on to help Phoenix House. Phoenix House is a organization that helps teens overcome addiction by using music. Its a great cause and all of the Audio Bloggers Live proceeds went to help Phoenix House carry on its work. There are so many ways to help Phoenix House so that it may help people overcome addiction. Click here to find out more Help Phoenix House.
Here is Graham Cochrane interviewing Mick Guzauski who has mixed Daft Punk, Pharrell Williams, Snoop Dogg.
Here is Ronan Chris Murphy interviewing Bob Clearmountain who has mixed David Bowie, The Rolling Stones and Nine Inch Nails and Dylan Dresdow who has mixed Black Eyed Peas, Pink and Wu Tang Clan.
Here is Ian Shepherd hosting a mastering panel discussion with some of the best mastering engineers John Rodd who has mastered Breaking Bad and Star Wars: Battlefront and The Lincoln Lawyer, Brian Lucey who has mastered The Black Keys, Arctic Monkeys and Cage The Elephant, and Maor Applebaum who has mastered Faith No More, Yes and Sepultura.
Here is Joe Gilder hosting another panel on how get your music in to film and TV with music supervisor Jonathan Leahy who placed music in the HBO show Girls, Fruitvale Station and Trainwreck, the founder of online A & R company Taxi Michael Laskow, and Bob Mair the owner of Black Toast music licencing and publishing which has placed music in True Blood, The Good Wife and Pitch Perfect 2.
Here is Ronan Chris Murphy of Recording Boot Camp talking about Analog to Digital Clipping and how there is no benefit of recording hot compared to lower level through your AD converter.
Here is Graham Cochrane of the Recording Revolution talking about the benifits of checking your mix in mono.
Here is Joe Gilder of Home Studio Corner gives us 4 tips that help us appear to have Golden Ears
Here is Ian Shepherd of Production Advise demonstrating the importance of checking a mix at different volumes
I have been listening to a lot of audio bloggers podcasts such as the the Home Studio Corner Podcast Pensados Place and the Simply Recording Podcast the past year and have learned so much from them. I even did an EP challenge with Joe Gilder from Home Studio Corner last year. I think I heard about the conference on the Home Studio Corner Podcast and it turned out that presale tickets were only $27, I knew I had to jump in the car and drive down to Santa Monica for the weekend. Plus it was my birthday, so I thought it would be a good excuse to get me out of town.
The speakers lined up for this conference were insane. My favorite audio bloggers were there Joe Gilder of Home Studio Corner, Graham Cochrane of the Recording Revolution, Ronan Chris Murphy of Recording Boot Camp and Ian Shepherd of Production Advise. They hosted the panels and had their own topic seminars.
As far as the guest speakers, WOW, Some of the most amazing mix and mastering engineers were there as well as some other top people in the industry.
When I first got there I was feeling a little antisocial but I started reaching out and introducing myself to people. I made some great friends and had a lot of inspiring conversations. It was nice to meet a lot of home studio folks. I feel somewhat isolated in Las Vegas when I am working in my home studios, so it was nice to meet others like me. It was also great to meet Joe Gilder after working with him online in the EP challenge.

[products ids=”7019 ,7014 ,7012 ,6997″]

The Octapad is a dynamically sensitive compatible eight-pad controller with memory. It has eight drum pads that can be hit to trigger MIDI notes on its MIDI out port. It produces no internal sounds but is used as a controller to control other MIDI sound devices. MIDI sound sources from synthesizers to drum machines can be hooked up to its MIDI out port and assigned to any of the eight pads. Parameters such as channel and sensitivity are adjustable for each pad. Up to four different patches can be memorized with, the patch Preset function.
Program Change messages can also be sent from the PAD-8. In addition to the eight pads, six inputs are provided for expansion to using other external pad controllers.
[ti_icon icon=”ti-angle-double-down” size=”default” style=”icon-left” corners=”default”]
[product id=”6870″]

This Simmons SDS7 review and tutorial will teach you how to use a Simmons SDS7 drum machine. You will learn about its features and how to program sounds.


1) Press The Program button (the program light will flash)

2) Rotate the incrementor to select the desired drum kit
3) Press program to select that drum kit
4) Rotate the incrementor to select the desired drum channel (the red program light will flash on the top of the selected drum channel)
.
5) Press program to select that drum channel
6) Now all 16 lights will flash

7) Select one of the 16 desired parameters to edit
8) Once the parameter is selected, its light will stay on and its current value will be displayed

9) Rotate the incrementor to change its value
10) To change more parameters for that drum channel before saving, press the currently select parameter (its light will be steady on).
11) All 16 parameter lights will blink
12) Go through this process to change as many parameters as needed, until you are ready to save your edits
13) To save all your edits, press the program button
14) If you want to ignore your changes press any button that is not lit, and you will be returned to the select channel mode
15) If you want to exit the select channel mode press any button that is not lit, and you will be returned to the original play mode where you can select the drum kit
1) Select drum kit No. 00
2) Press the program button (the prog jigsaw light will be on)

3) Rotate the incrementor to select the desired drum kit to copy sounds from
4) Press program to select that drum kit
5) Rotate the incrementor to select the desired drum channel
6) Press program to select that drum channel to copy sounds from
7) Repeat 5 and 6 to select as many drum channels from that kit you would like to copy
8) When all the drum channels are selected that you want to copy press button “E”
9) Select the kit number to copy the drum channels to
10) Press the “N” button to hear the copied drum channels along with the unselected channels in the new drum kit
11) Press program to overwrite the old channels with the new ones
Check out our handpicked audio items for sale